
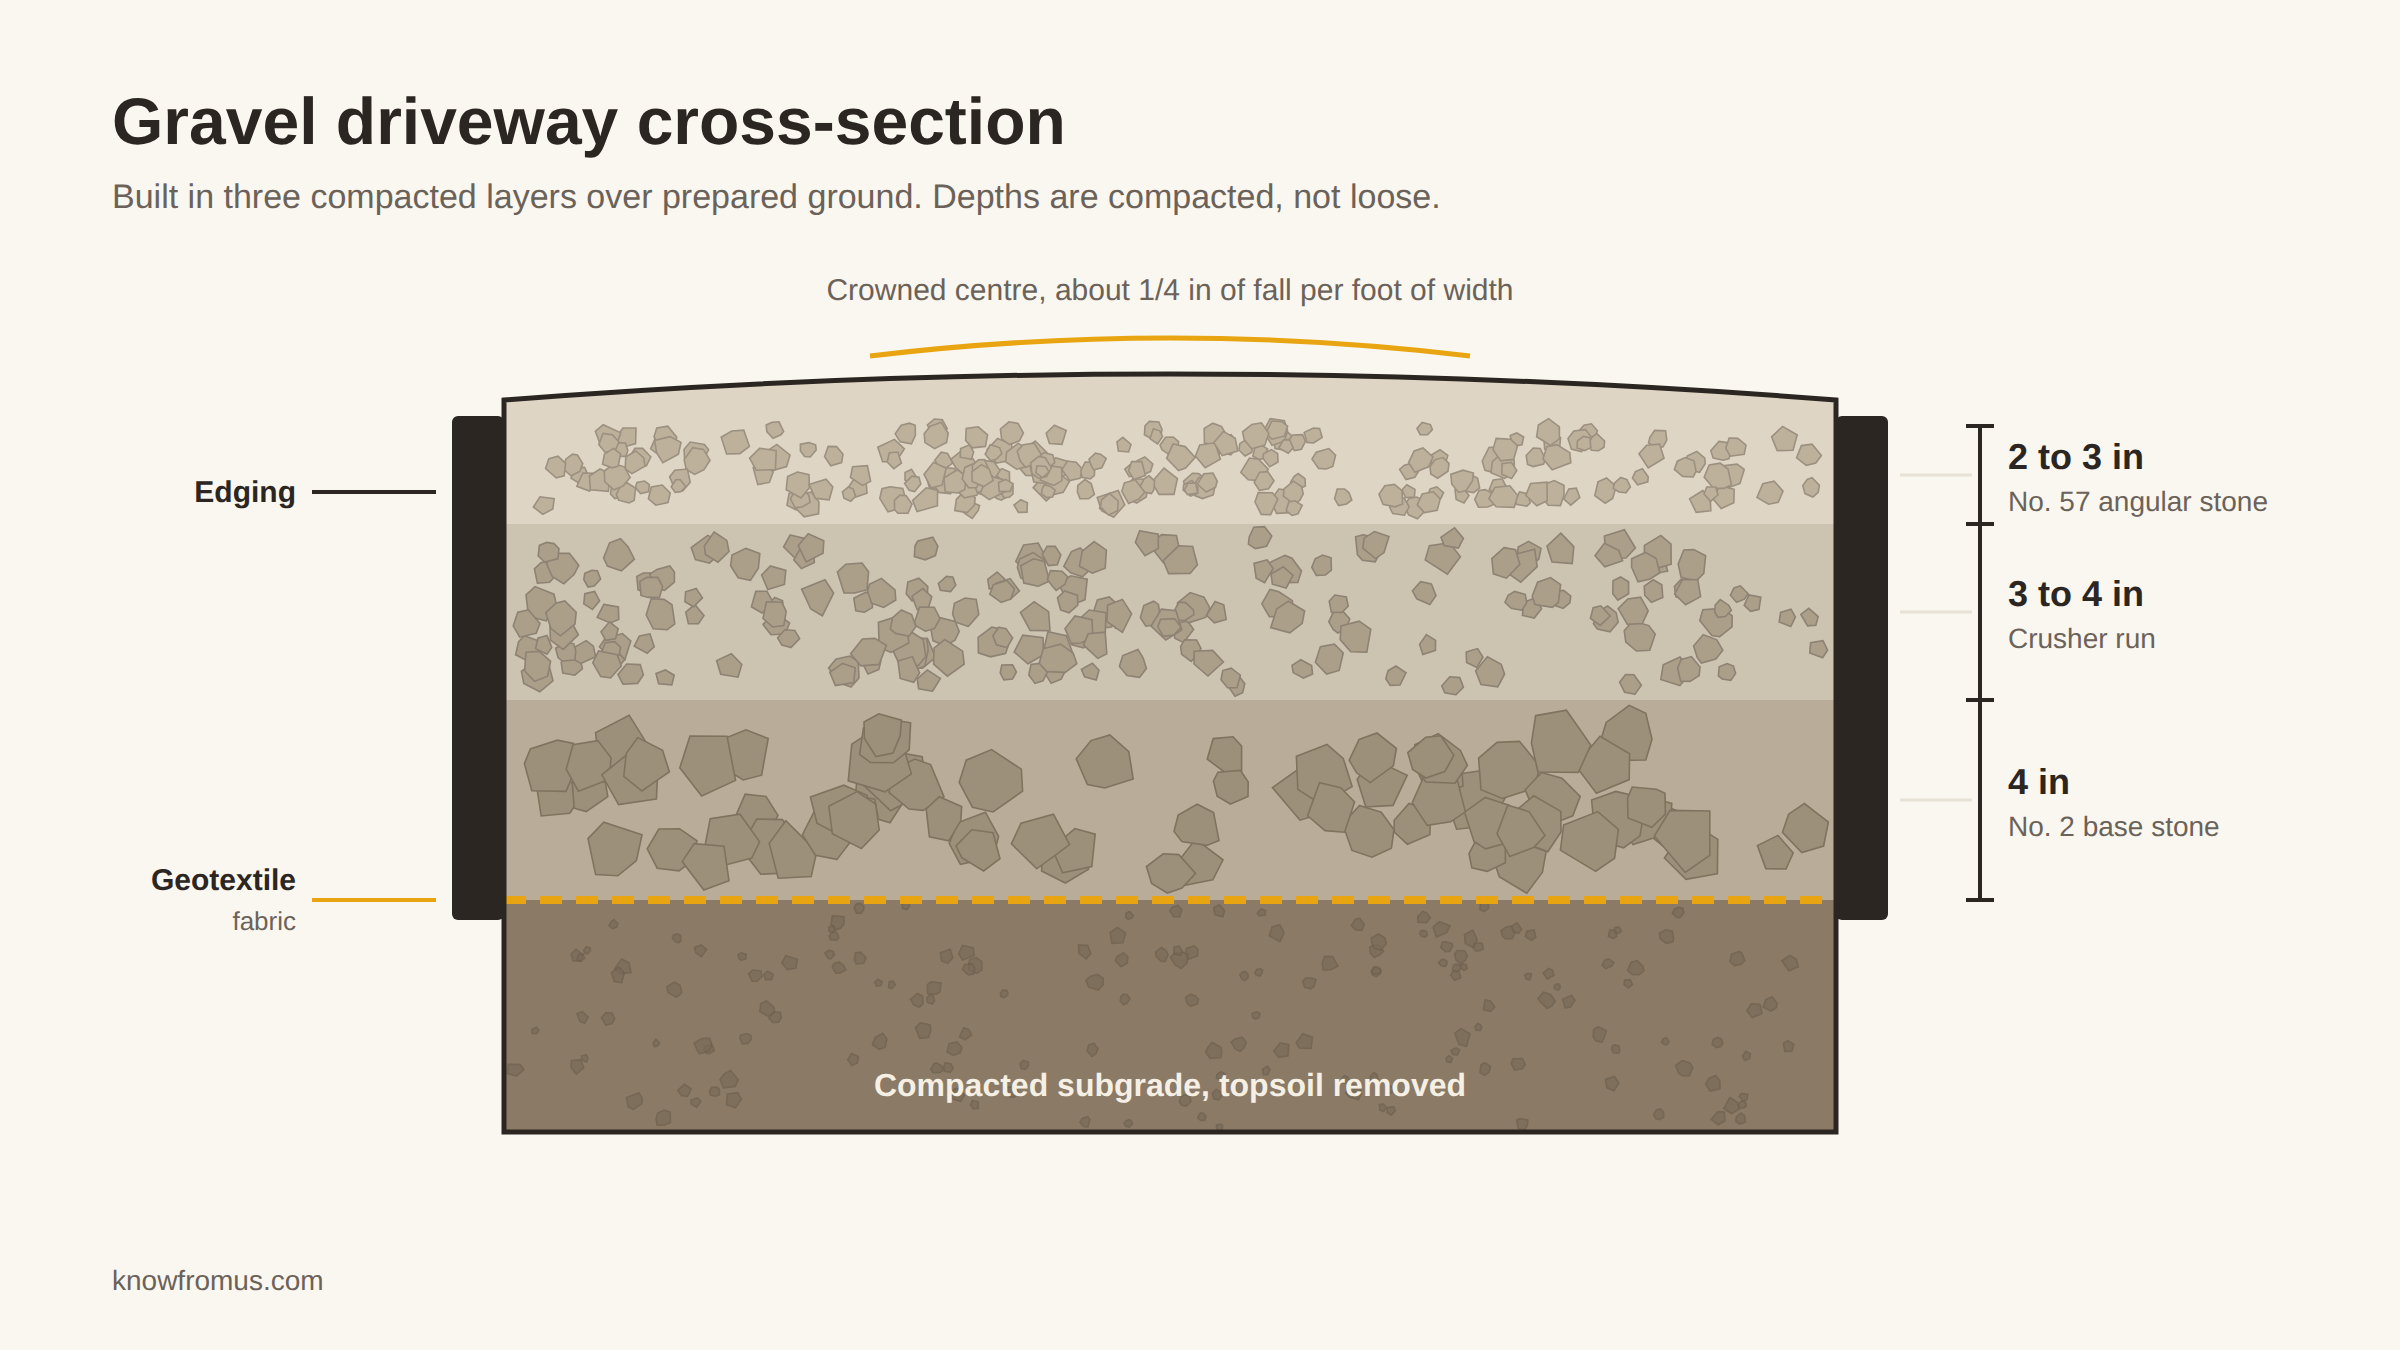
Most gravel driveways that fail do not fail because someone skimped on stone. They fail because the water had nowhere to go, or because the layer underneath was never right in the first place. Put six inches of beautiful stone over soft ground and within a winter you will have ruts, a soft patch by the gate, and stone migrating into the lawn.
A gravel driveway built properly is a structure. It has a prepared base, graded layers of different material, a shape that sheds water, and edges that hold it in. None of it is complicated, but the order matters, and almost all of the work happens before the stone you can see goes down.
Start With the Ground, Not the Stone
Strip the topsoil. All of it. Topsoil is organic, it holds water, it compresses under load, and it will keep compressing for years. Dig down until you reach firm subsoil, which on most plots is somewhere between 6 and 12 inches down, though on an old garden or a filled site it can be considerably more.
Then look at what you have uncovered. Firm clay or sandy subsoil is a good foundation. Soft spots that your boot sinks into are not, and no amount of stone on top will fix them. Dig those out and replace them with compacted stone before you go any further, because a soft spot will find its way to the surface eventually.
Compact the exposed subgrade with a plate compactor or a roller before anything goes on it. This step gets skipped constantly and it is one of the cheapest insurance policies on the whole job.
Lay Geotextile Fabric
Roll woven geotextile fabric across the compacted subgrade before the first stone. It costs very little relative to the rest of the job and it does two things that matter enormously over time.
It stops the stone pressing down into the soil, which is how driveways quietly lose their base over five or ten years. And it stops fine soil pumping up into the stone when the ground is wet and a car drives over it, which is what turns a free-draining layer into mud with rocks in it.
Overlap the edges of adjacent rolls by about a foot, and run the fabric up the sides of the excavation rather than cutting it flush.
The Three Layers
A driveway is built in layers because each one does a different job, and because stone compacts properly only in shallow lifts. Dump 10 inches of material in one go and the bottom half will never consolidate, whatever you run over the top of it.
- Base layer: 4 inches of large angular stone, often sold as number 2 stone at roughly 2 to 2.5 inches. This spreads the load and bridges soft ground.
- Middle layer: 3 to 4 inches of crusher run, which is crushed stone with the fines left in. The fines fill the voids and lock the layer into something close to solid when compacted.
- Top layer: 2 to 3 inches of the stone you actually want to look at, usually number 57 or 3/4 inch angular stone.
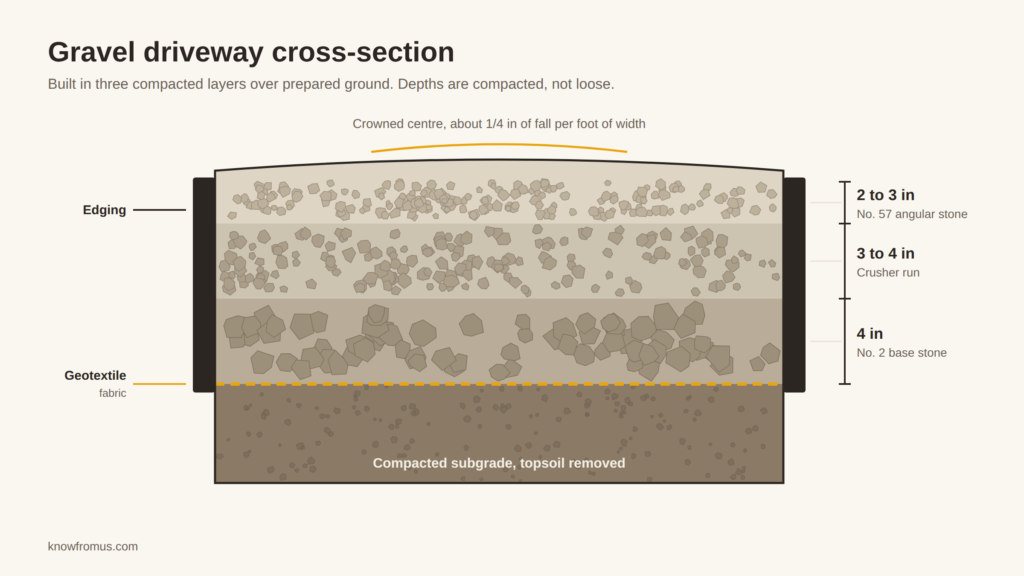
Compact each layer separately before the next goes down. A plate compactor is fine for a short residential drive, a roller is better for anything long, and both are cheap to hire for a day. The Federal Highway Administration’s gravel roads guide sets out the same layered approach for public roads, at greater depths.
Because each layer is a different material at a different density, each needs its own order. Run our gravel calculator three times, once per layer with the right material selected, and add the tonnages together. The base layer is usually the largest single order, which surprises people who budgeted only for the stone they can see.
Shape It to Shed Water
Water is what destroys a gravel driveway, and the surface has to move it off rather than hold it. There are two ways to do that and you want one of them.
A crown is the usual approach: the centre of the drive sits slightly higher than the edges, so water runs off both sides. Aim for about a quarter inch of fall per foot of width, which on a 12 foot drive means the centre is roughly 1.5 inches proud of the edges. It looks like almost nothing when you stand on it and it works.
Cross-slope is the alternative, where the whole surface tilts to one side. It suits a drive running along a slope or beside a bank, and the same quarter inch per foot applies.
Whichever you use, think about where the water ends up. A drive that sheds neatly into a flowerbed that then floods has moved the problem rather than solved it. On a sloping site, a shallow swale along the uphill edge, or a French drain if the volume justifies it, keeps run-off from washing across the surface and taking the top layer with it.
Edge It, or Watch It Spread
Loose stone moves sideways under tyres. Without something holding the edges, a gravel driveway gets wider and thinner every year, and the stone ends up in the grass where it meets a mower.
Options run from cheap to permanent. Pressure-treated timber is inexpensive and lasts perhaps a decade. Steel or aluminium landscape edging is nearly invisible and lasts far longer. A concrete kerb or a row of blocks set in concrete is the most durable, and it is also the only option that properly resists a car clipping the edge.
Whatever you choose, set it before the top layer goes down, not after.
Rounded Stone Is the Wrong Stone
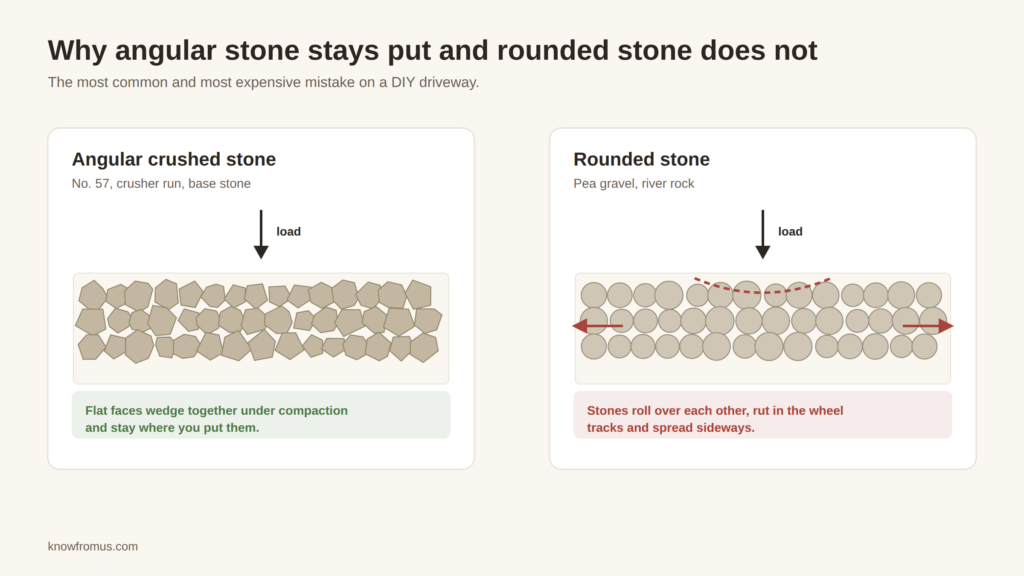
This is the single most common mistake on a DIY gravel driveway. Pea gravel and river rock are rounded, smooth, and pleasant underfoot, and they are completely wrong for a surface carrying vehicles.
Rounded stones cannot interlock. They roll over each other under load, so tyres push them aside, ruts form in the wheel tracks, and the material migrates toward the edges. Angular crushed stone has flat faces that wedge together under compaction and stay where you put them.
If you want the look of pea gravel, it can work as a top dressing over a properly compacted crusher run base, with firm edging, on a drive that sees light use. It will still need raking back periodically. On a working driveway, use angular stone.
Maintenance Is Minimal but It Is Not Zero
A well-built gravel driveway asks very little, which is most of its appeal. What it does ask for is worth doing.
- Rake the surface back into shape once or twice a year, pulling stone from the edges back toward the centre and keeping the crown intact.
- Fill potholes as soon as they appear. A pothole collects water, the water softens what is beneath it, and a small hole becomes a large one quickly. Rake out the loose material, fill with crusher run rather than top stone, and compact it.
- Top up the surface layer every three to five years, which usually means an inch or so of fresh stone rather than a full re-lay.
- Keep the drainage clear. The swale or ditch alongside matters more than the stone itself.
In snow country, set the plough blade an inch above the surface or fit skid shoes. A blade run flat on gravel removes the top layer along with the snow, and you will be replacing stone every spring.
What It Takes to Get a Gravel Driveway Right
Strip to firm ground. Compact the subgrade. Lay fabric. Build up in three compacted layers of the right material. Crown it. Edge it. Use angular stone, not rounded.
Do all of that and the drive will hold up for decades with an afternoon of raking a year. Skip the base preparation and you will be back doing it properly in two or three years, having paid for the stone twice.
To work out quantities for each layer, use our gravel calculator. If you are considering paving over the top later, the asphalt calculator covers that, and the base you have just built is exactly what asphalt needs underneath it. All our tools are listed in the construction calculators section.